Deployment on Virtual Machine
Download this guide as a PDF for printing or offline reading.
This guide walks a customer platform engineer through installing the Milestone Data Collection Agent (DCA) on a single Linux virtual machine — typically an AWS EC2 instance, but any Linux VM that meets the requirements below works the same way. It is a self-contained, step-by-step walkthrough: you pull one container image, run an interactive setup wizard, and start the agent with Docker Compose.
The DCA collects engineering data from your source-control, project-management, and AI-coding tools and uploads it to Milestone. It runs entirely on your VM; the only outbound traffic is to the systems it collects from and the Milestone upload endpoint.
By the end you will have:
- A VM that meets the size and network requirements.
- The DCA image pulled from Milestone's registry.
- A configured agent (tenant, providers, integrations) running under Docker Compose, with health checks passing.
How to read this guide. Numbered sections and the commands in them are the steps to run, in order. The shaded boxes are context, not steps — a Why this matters box explains the reasoning behind a step; other boxes flag a gotcha or an option. You can install by following only the numbered steps, and read the boxes when you want the "why."
Prefer to run on Kubernetes? The agent can also be deployed to a Kubernetes cluster via Helm — a better fit if you already run Kubernetes, want scale-to-zero workers, or are standing up multiple tenants. A separate Kubernetes installation guide is available — ask your Milestone representative for it. Otherwise, this VM guide is the simplest path and is recommended for a single-tenant collector.
Architecture
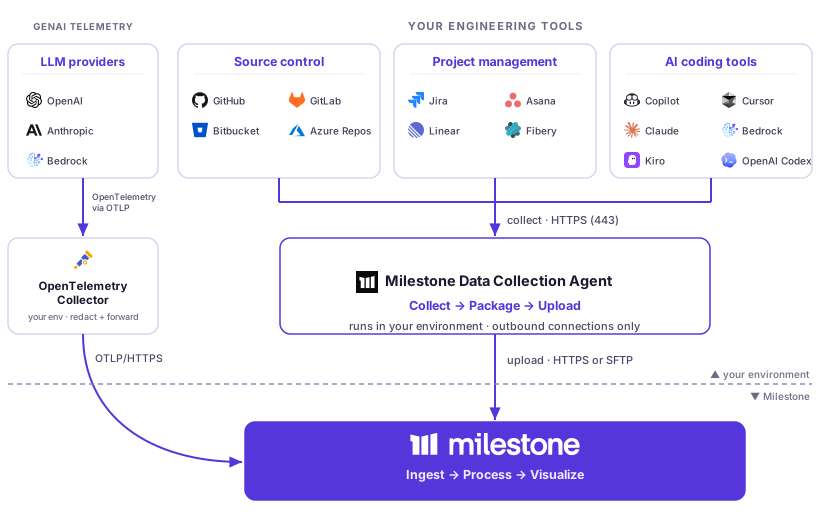
The agent runs entirely inside your environment and makes only outbound connections — it collects from your engineering tools, packages the data, and uploads it to Milestone, which ingests it and surfaces it in your dashboard.
1. Prerequisites
1.1 VM size
| Requirement | Specification |
|---|---|
| Architecture | AMD64 (x86_64) |
| vCPU | 8 cores |
| RAM | 16 GB |
| Storage | 200 GB |
| OS | Ubuntu 20.04 or newer |
ARM / Apple Silicon (Graviton, arm64) is not supported. On EC2 this maps to
roughly an m5.2xlarge (or m6i.2xlarge) with a 200 GB gp3 root or data
volume; pick an x86_64 AMI, not a Graviton one.
1.2 Network — outbound HTTPS (port 443)
Open an outbound 443 path (NAT gateway, internet gateway, or proxy) from the VM to:
- Milestone's registry —
docker.io,registry-1.docker.io(image pull). - Milestone upload endpoint —
upload.mstone.ai(the presigned-URL service) and the S3 host it hands back,milestone-data-collection.s3.us-east-1.amazonaws.com. Allowing only the presign service is not enough — without S3 egress the upload step fails. - Your git provider — e.g.
github.com/api.github.com,gitlab.com,api.bitbucket.org, or your self-hosted / Enterprise host. - Jira (if used) — e.g.
your-company.atlassian.net, or your Jira Data Center host. - Any GenAI tool endpoints you want telemetry from — e.g.
cursor.com,api.anthropic.com,api.openai.com.
Why this matters: the DCA only makes outbound connections — nothing connects to the VM. On EC2 that means the instance's security group needs no inbound rule beyond your own SSH access.
Private CA / TLS-inspecting proxy: if any endpoint above (or a forward proxy in front of it) presents a certificate signed by your internal CA rather than a public one, tell us before install — the agent needs your CA bundle mounted, and we'll walk you through it.
1.3 Software
- Docker Engine 20.10+ with the Compose v2 plugin.
- The user running the agent in the
dockergroup or root/sudo access.
Verify:
docker --version        # Docker version 20.10+
docker compose version  # Docker Compose version v2.x
If Docker is not installed, follow the official Docker install guide. On a fresh Ubuntu EC2 instance:
sudo apt-get update && sudo apt-get install -y docker.io docker-compose-plugin
sudo usermod -aG docker "$USER"
exit   # log back in for the group change to take effect
1.4 What Milestone provides
Before you start, Milestone will send you, via 1Password secure share:
- A tenant name (e.g.
acme-corp). - A read-only Docker Hub username and password for the image pull.
- An upload API key for the presigned-URL endpoint.
2. Authenticate with Docker Hub
The image is private. Log in with the credentials Milestone provided:
sudo docker login -u <username>
Enter the password when prompted.
3. Pull the image
sudo docker pull evno/milestone-data-collection-agent:latest
4. Run the setup wizard
Create a working directory and run init. This creates the directory structure
(config/, secrets/, state/) and launches the interactive wizard:
mkdir ~/data-collection-agent && cd ~/data-collection-agent

sudo docker run --rm -it \
  -v "$(pwd)":/output \
  evno/milestone-data-collection-agent:latest init
The wizard walks through:
- Basic settings — the tenant name Milestone assigned you (e.g.
acme-corp) and the date to start gathering data from. - Upload destination — choose Presigned URL (default
upload.mstone.ai) and paste the upload API key Milestone provided. (S3 and SFTP are also offered for customers who prefer them — see §5.) - Source control — GitHub, GitLab, Bitbucket, or Azure Repos (API server, tokens, orgs), plus optional git blame and git AI-notes collection. For GitHub, the recommended path is a GitHub App integration — your Milestone representative can provide the setup steps.
- Project management — Jira, plus Asana, Linear, and Fibery if used.
- GenAI tools — GitHub Copilot, Cursor, Anthropic (Claude), AWS Bedrock, Kiro, OpenAI Codex, and AWS Identity Center.
Why there's no "how often" step: you choose which sources to enable; the agent then collects each on a sensible default schedule rather than asking you to set frequencies. The generated
config/config.yamlrecords each flow's schedule, so you can adjust the cadence there and restart (§8) if you need to.
When finished, the wizard generates:
| File | Purpose |
|---|---|
config/config.yaml | Agent configuration |
secrets/* | API tokens and credentials (never leave the VM) |
docker-compose.yml | Ready-to-use Compose manifest |
dca.sh | Helper script with shortcuts for common operations (see §8) |
5. Upload destination options
The default and recommended transport is the presigned URL service
(upload.mstone.ai) — the wizard configures it from the API key Milestone gives
you, and no cloud credentials live on your VM. Two alternatives are offered for
customers who prefer to keep the upload inside their own account:
5.1 Direct S3
If you point the agent at your own S3 bucket, the VM's identity (an EC2 instance
profile, recommended, or static IAM user keys) needs s3:PutObject on the
bucket prefix the agent writes to. A minimal instance-role policy:
{
  "Version": "2012-10-17",
  "Statement": [
    {
      "Effect": "Allow",
      "Action": "s3:PutObject",
      "Resource": "arn:aws:s3:::<your-bucket>/<tenant-prefix>/*"
    }
  ]
}
Attach it to the instance profile so no keys are stored on disk. If you must use
static keys, the wizard stores them under secrets/ — treat that directory as
sensitive.
5.2 SFTP
For SFTP, have the host, credentials, and remote base path ready before the wizard — the remote path must already exist and be writable; the agent does not create it. A failed connection or a missing remote directory surfaces in §9 (Uploads failing).
6. Start the agent
cd ~/data-collection-agent
docker compose up -d
7. Verify
# Health check
curl -s http://localhost:8080/health
# → {"status": "ok"}

# Readiness
curl -s http://localhost:8080/ready
# → {"status": "ready"}

# Detailed status (flow schedules, last run times)
curl -s http://localhost:8080/status | python3 -m json.tool

# Tail logs
docker compose logs -f
That completes the installation: sections 1–7 above are all you need to get the agent running.
✅ Installation complete. If the §7 health checks pass, the agent is installed and collecting. Everything below is reference for after install — you don't need it to finish setting up; come back to it as needed.
After installation
8. Maintenance and operations
Routine tasks for keeping the agent running after install — refer to these as needed, not in order.
The setup wizard drops a dca.sh helper in your working directory that wraps the
most common tasks. Run it from ~/data-collection-agent:
| Command | What it does |
|---|---|
./dca.sh setup | Re-run the configuration wizard, then restart to apply changes |
./dca.sh restart | Stop and start the agent (applies config/secret changes) |
./dca.sh update | Pull the latest agent image and restart |
./dca.sh trigger | Trigger a collection flow on demand (interactive) |
./dca.sh reset-watermark [flow] [YYYY-MM-DD] | Reset a flow's collection watermarks (stops + restarts the agent). Run with no flow for an interactive picker. Pass a date to rewind collection to it, or omit the date to re-collect from scratch. |
./dca.sh logs | Tail the agent logs |
./dca.sh status | Show agent status |
Most of these map to the docker compose commands shown in the subsections below —
use whichever you prefer.
View logs
docker compose logs -f
docker compose logs --since 1h
docker compose logs 2>&1 | grep -i error
Restart
docker compose restart
Trigger a collection run
To run a flow immediately instead of waiting for its schedule:
./dca.sh trigger
Pick the flow from the interactive list. The agent must be running (see Restart).
Update the image
docker compose pull
docker compose up -d
Or use the shortcut: ./dca.sh update. Either way, the agent refreshes dca.sh
itself on startup, so the helper script always matches the running image (no need
to re-run the setup wizard just to pick up new dca.sh commands). This requires
the - .:/project volume mount in docker-compose.yml; the wizard adds it, and
warns if an older install is missing it.
Reconfigure
Re-run the setup wizard to regenerate configuration, then restart:
docker compose run --rm data-collection-agent setup
docker compose up -d
Rotate a token or credential
Provider tokens (GitHub, Jira, etc.) and the upload API key live as individual
files under secrets/, referenced by token_file / api_key_file paths in
config.yaml. To rotate one, replace the file contents and restart — no
reconfigure needed:
printf '%s' '<new-token>' > ~/data-collection-agent/secrets/github-token
docker compose restart
Rotate on the cadence your security policy requires (and whenever a token's
scopes change). If you keep secrets in a manager such as HashiCorp Vault or AWS
Secrets Manager, fetch them into secrets/ as part of your own deploy step
rather than editing the files by hand.
Back up agent state
The state/ directory holds the SQLite watermark database (agent.db) and the
pending-upload outbox. Backing it up is optional but recommended: if the VM is
lost and state/ is gone, collectors re-fetch from the beginning on the next run
(correct, but slower and heavier on your source APIs). A periodic copy of
state/agent.db is enough to preserve watermarks.
Reset state
Removes all watermarks — every collector re-fetches from the beginning:
docker compose down
rm -rf ~/data-collection-agent/state/*
docker compose up -d
Disk space
du -sh ~/data-collection-agent/state/*
Key directories inside state/:
work/— temporary files (auto-cleaned)outbox/— pending uploads (cleaned after a successful upload)clone_cache/— cached repo clones
9. Troubleshooting
Container won't start
docker compose logs
Common causes:
- Config syntax error — validate with
docker compose run --rm data-collection-agent config validate /config/config.yaml. - Missing secret file — every
token_file/api_key_filepath inconfig.yamlmust have a matching file insecrets/. - Port conflict — another service is already on port 8080.
No repos discovered
docker compose logs 2>&1 | grep -i discover
Common causes: token expired or wrong scopes; org name doesn't match exactly (case-sensitive); a firewall blocking outbound HTTPS.
Uploads failing
docker compose logs 2>&1 | grep -i upload
Common causes:
- Presigned URL — wrong endpoint or invalid API key, or S3 egress
(
milestone-data-collection.s3.us-east-1.amazonaws.com) not allowed (see §1.2). - S3 (direct) — wrong credentials, missing bucket, or IAM policy missing
s3:PutObject(see §5.1). - SFTP — host unreachable, wrong credentials, or remote path doesn't exist (see §5.2).
Inspect the local database
The agent's SQLite database is at state/agent.db:
sqlite3 ~/data-collection-agent/state/agent.db \
  "SELECT * FROM flow_runs ORDER BY started_at DESC LIMIT 10"
10. What happens next
Once uploads are succeeding, Milestone ingests your engineering data and it
appears in your Milestone dashboard — no further action on the VM is required.
The agent keeps running on its flow schedules; check /status (§7) any time to
see when each collector last ran and when it runs next. If you don't see data in
the dashboard within the expected window, work through §9 (Uploads failing and
No repos discovered first), then contact your Milestone representative with the
output of curl -s http://localhost:8080/status.
Questions or a non-standard environment? Contact your Milestone representative before installing.